PhotoDoodle: 예술적 이미지 편집을 위한 새로운 접근법
PhotoDoodle: 예술적 이미지 편집의 혁신
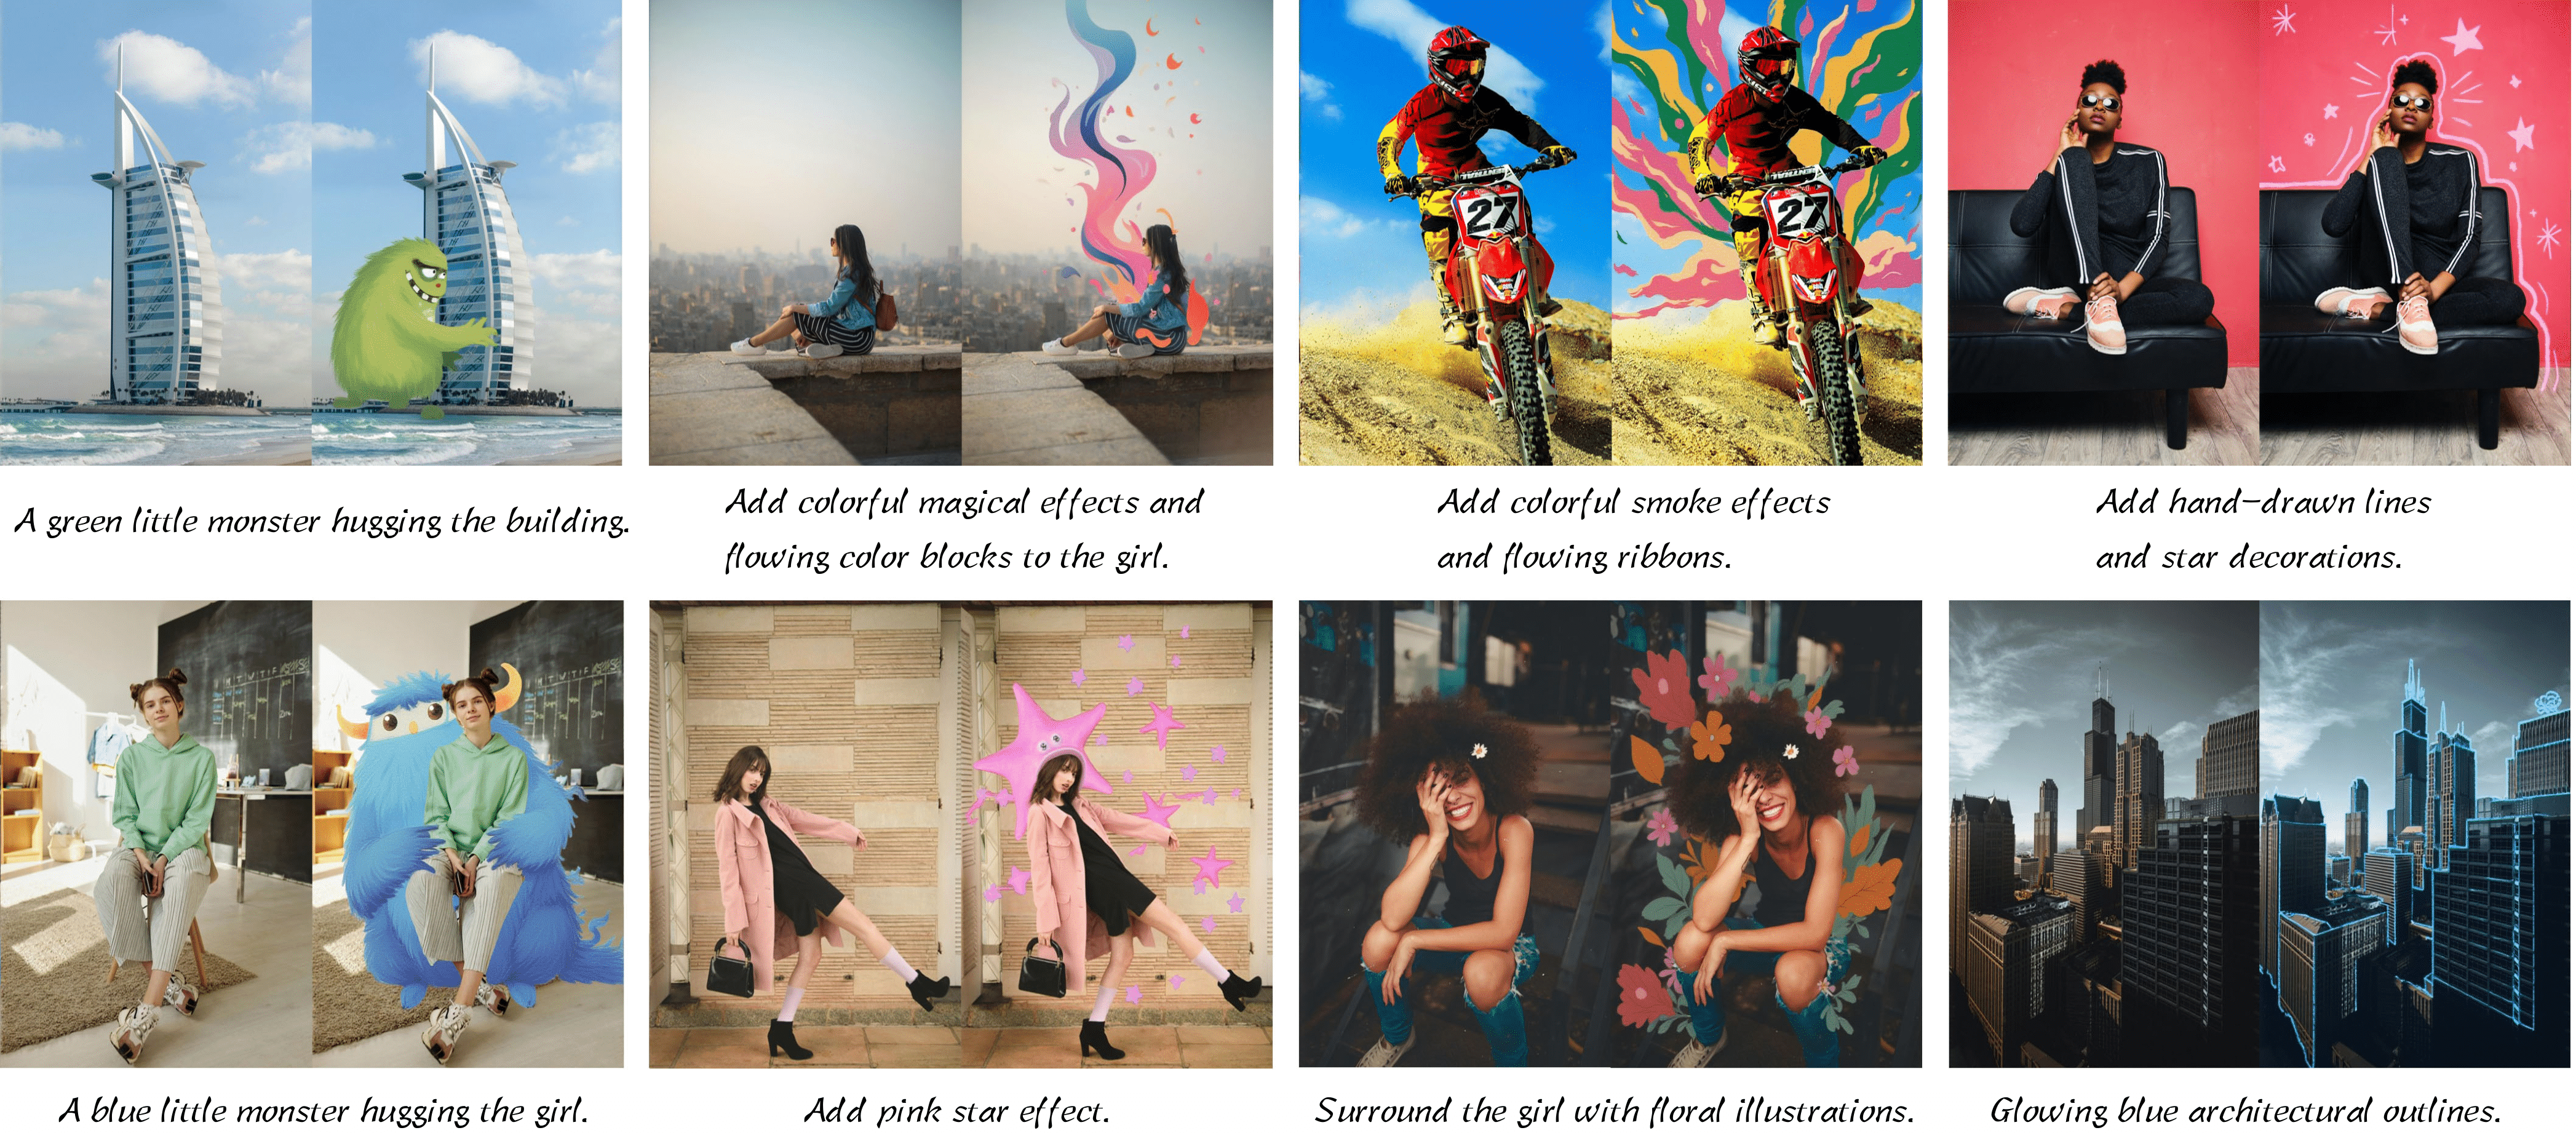
🎨 예술적 이미지 편집을 위한 새로운 패러다임, PhotoDoodle
최근 AI 기술의 발전으로 이미지 생성과 편집의 경계가 허물어지고 있습니다. 그러나 기존의 이미지 편집 모델들은 스타일을 유지하면서 자연스럽게 장식 요소를 추가하는 것이 어려웠습니다. 이 과정에서 아티스트들이 원하는 스타일을 반영하기 위해 많은 수작업이 필요하며, 편집된 이미지가 원본과 조화롭게 어우러지는 것이 쉽지 않았습니다.
📌 논문 링크: https://arxiv.org/abs/2502.14397
📌 프로젝트 페이지: https://github.com/showlab/PhotoDoodle
📌 Hugging Face Model: https://huggingface.co/nicolaus-huang/PhotoDoodle
PhotoDoodle은 이러한 한계를 극복하기 위해 개발된 Diffusion Transformer (DiT) 기반의 새로운 이미지 편집 모델입니다. 소량의 샘플(30~50쌍의 이미지)만으로도 개별 아티스트의 스타일을 학습하여, 배경을 유지하면서 자연스럽게 장식 요소를 추가할 수 있습니다. 이를 통해, 단순한 이미지 보정이 아닌, 창의적이고 예술적인 변형이 가능합니다. 또한, 다양한 도구와 결합하여 보다 직관적인 인터페이스로 활용할 수도 있습니다.
🚀 1. PhotoDoodle의 핵심 개요
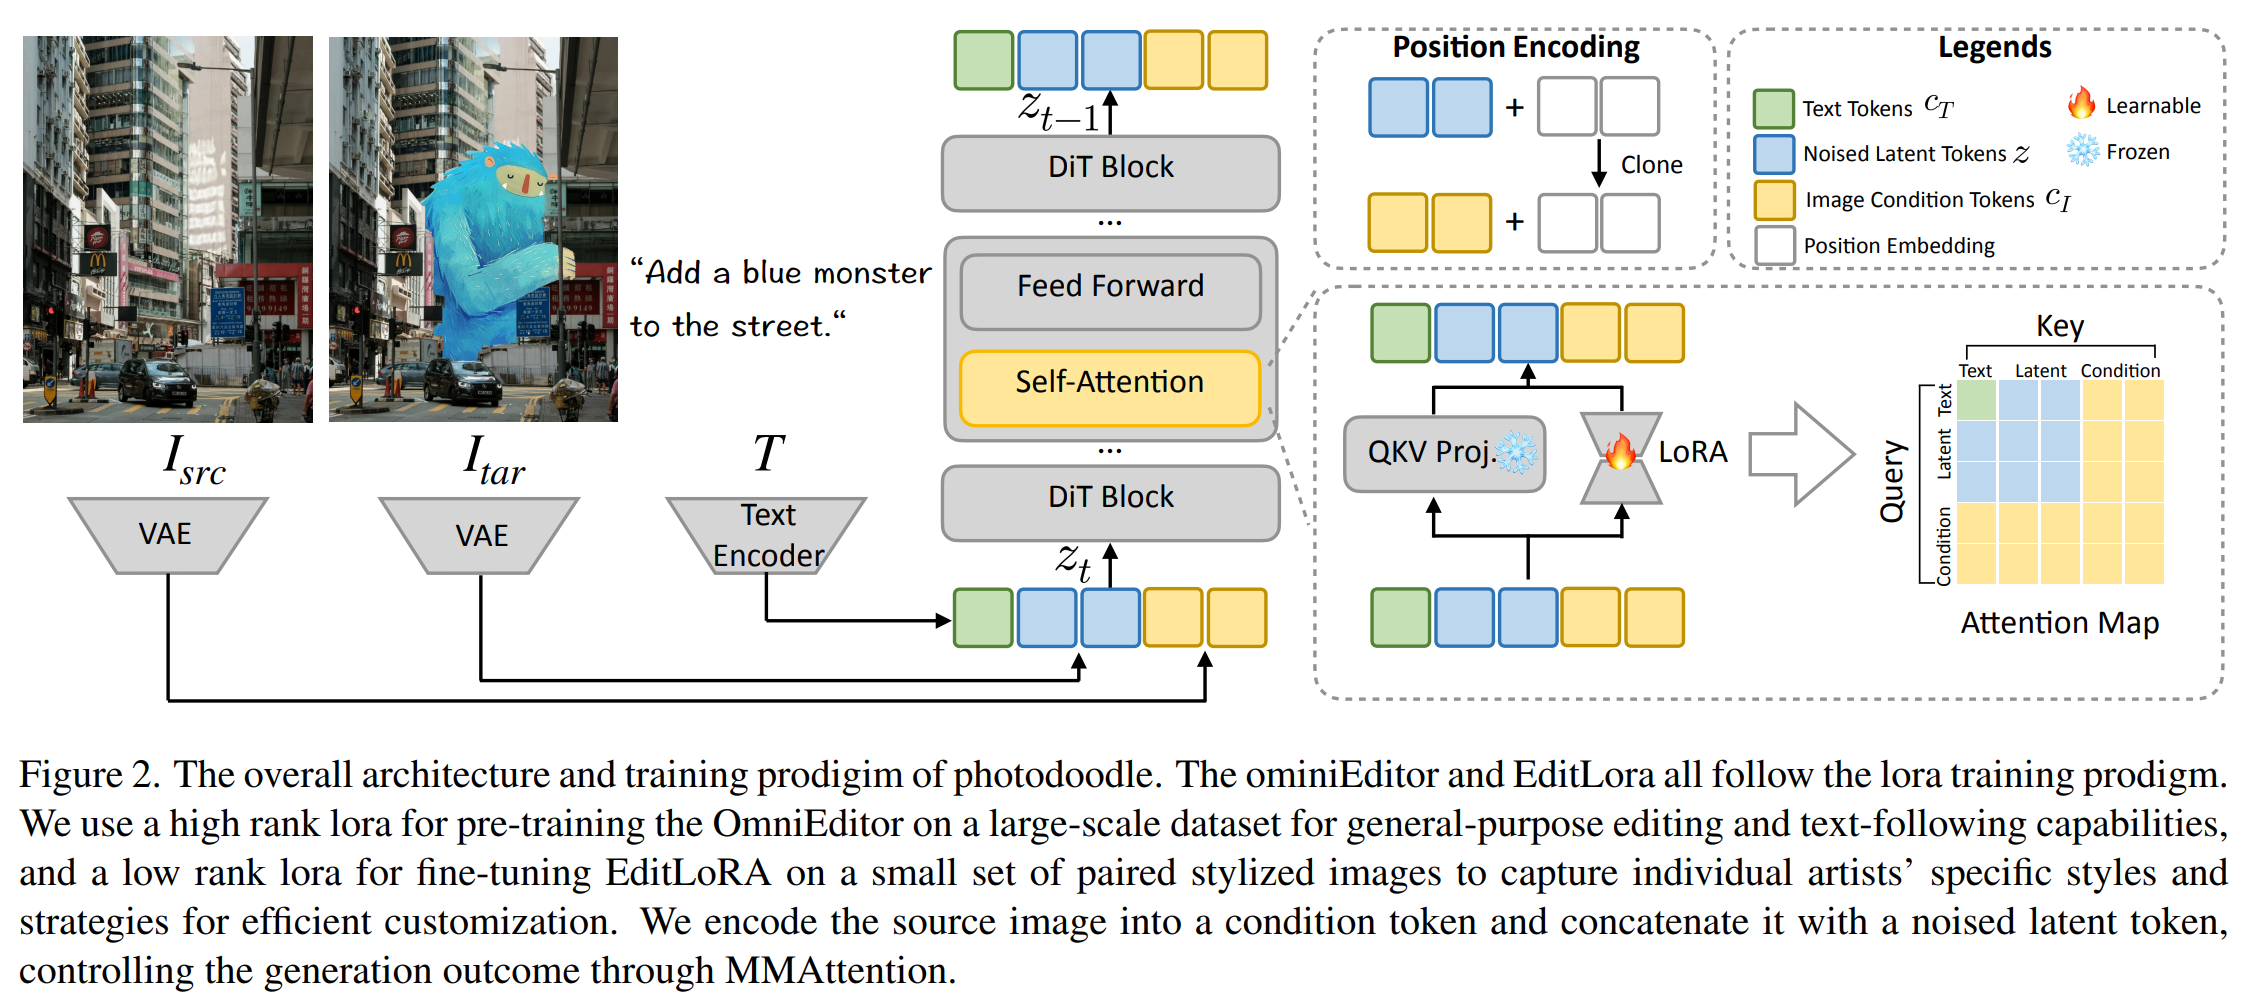
PhotoDoodle은 두 단계의 학습 과정을 통해 동작합니다:
- OmniEditor Pre-training: 대규모 이미지 편집 데이터(3.5M 쌍)로 사전 학습하여 일반적인 이미지 편집 능력을 습득
- EditLoRA Fine-tuning: 특정 예술가의 스타일을 학습할 수 있도록 소량의 예제(30~50 쌍)로 미세 조정
이 과정 덕분에, PhotoDoodle은 배경의 일관성을 유지하면서도 사용자 정의된 예술적 변형을 적용할 수 있습니다.
🎯 주요 기능
✅ 배경을 유지하면서 자연스러운 이미지 편집
✅ 소량의 예제만으로도 특정 아티스트의 스타일 학습 가능
✅ Diffusion Transformer (DiT) 기반으로 고해상도 이미지 편집 가능
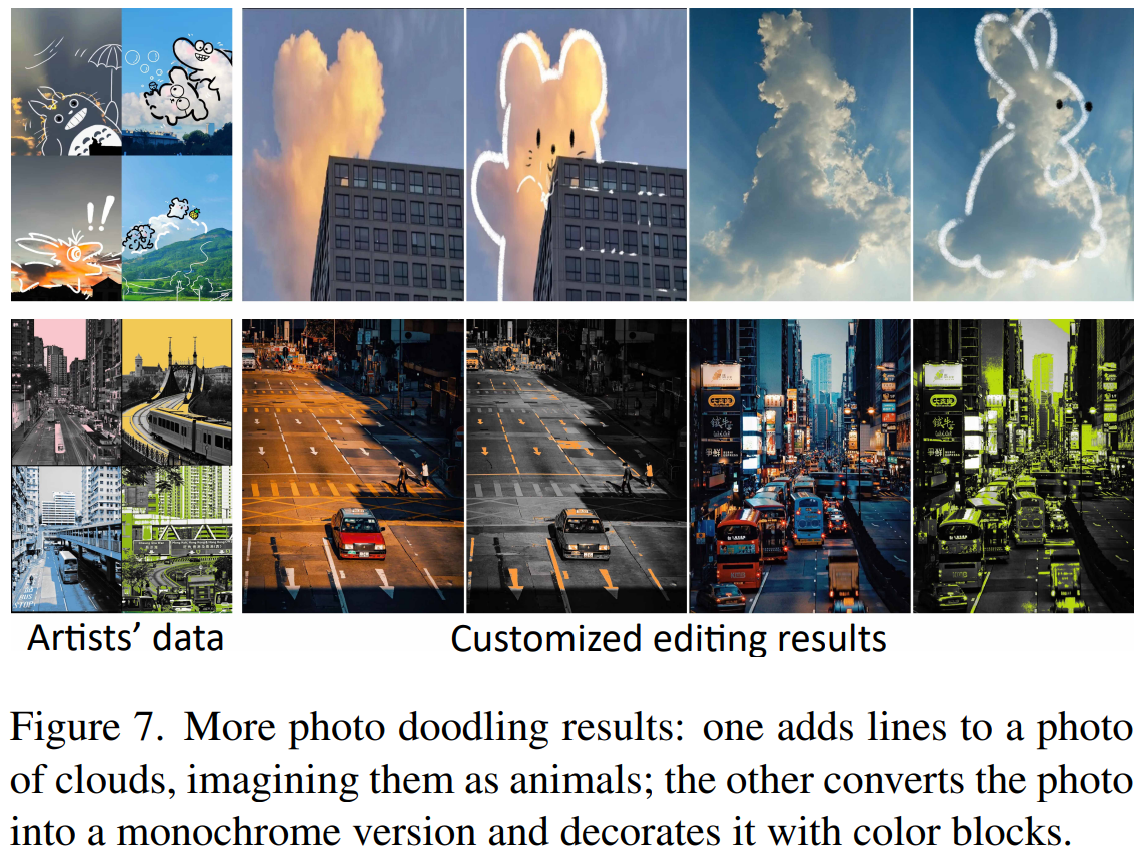
✅ 다양한 스타일 지원 (예: 몬스터 삽화, 마법 효과, 3D 스타일, 윤곽선 드로잉 등)
✅ 텍스트 기반 프롬프트로 직관적인 이미지 변형 가능
✅ 높은 정확도로 스타일을 재현하는 AI 기반 자동화 기능 제공
🏗️ 2. PhotoDoodle의 내부 아키텍처
PhotoDoodle은 Diffusion Transformer (DiT) 모델을 기반으로 설계되었습니다. 이 모델은 이미지 편집을 위한 고급 기능을 제공하며, 자연스러운 스타일 변형과 세밀한 조정이 가능하도록 최적화되었습니다.
🟢 OmniEditor: 일반적인 이미지 편집을 위한 사전 학습 모델
- 3.5M 개의 이미지 편집 데이터셋을 활용한 대규모 학습
- 위치 정보 복제(Position Encoding Cloning) 를 활용하여 원본과 편집본 간의 일관성 유지
- 노이즈 프리 조건부 생성(Noise-Free Conditioning) 으로 배경 왜곡 방지
- 다양한 스타일을 적용하기 위해 텍스트 프롬프트를 기반으로 조정 가능
🔵 EditLoRA: 소량의 데이터로 스타일 학습
- LoRA(Low-Rank Adaptation) 를 활용하여 특정 스타일을 효율적으로 미세 조정
- 30~50쌍의 이미지 데이터만으로도 새로운 스타일 학습 가능
- 배경을 유지하면서 아티스트의 스타일을 자연스럽게 적용
- 복잡한 스타일 조합도 가능하여 창의적인 편집을 지원
- 미리 학습된 모델을 활용하여 사용자 맞춤형 이미지 변환 가능
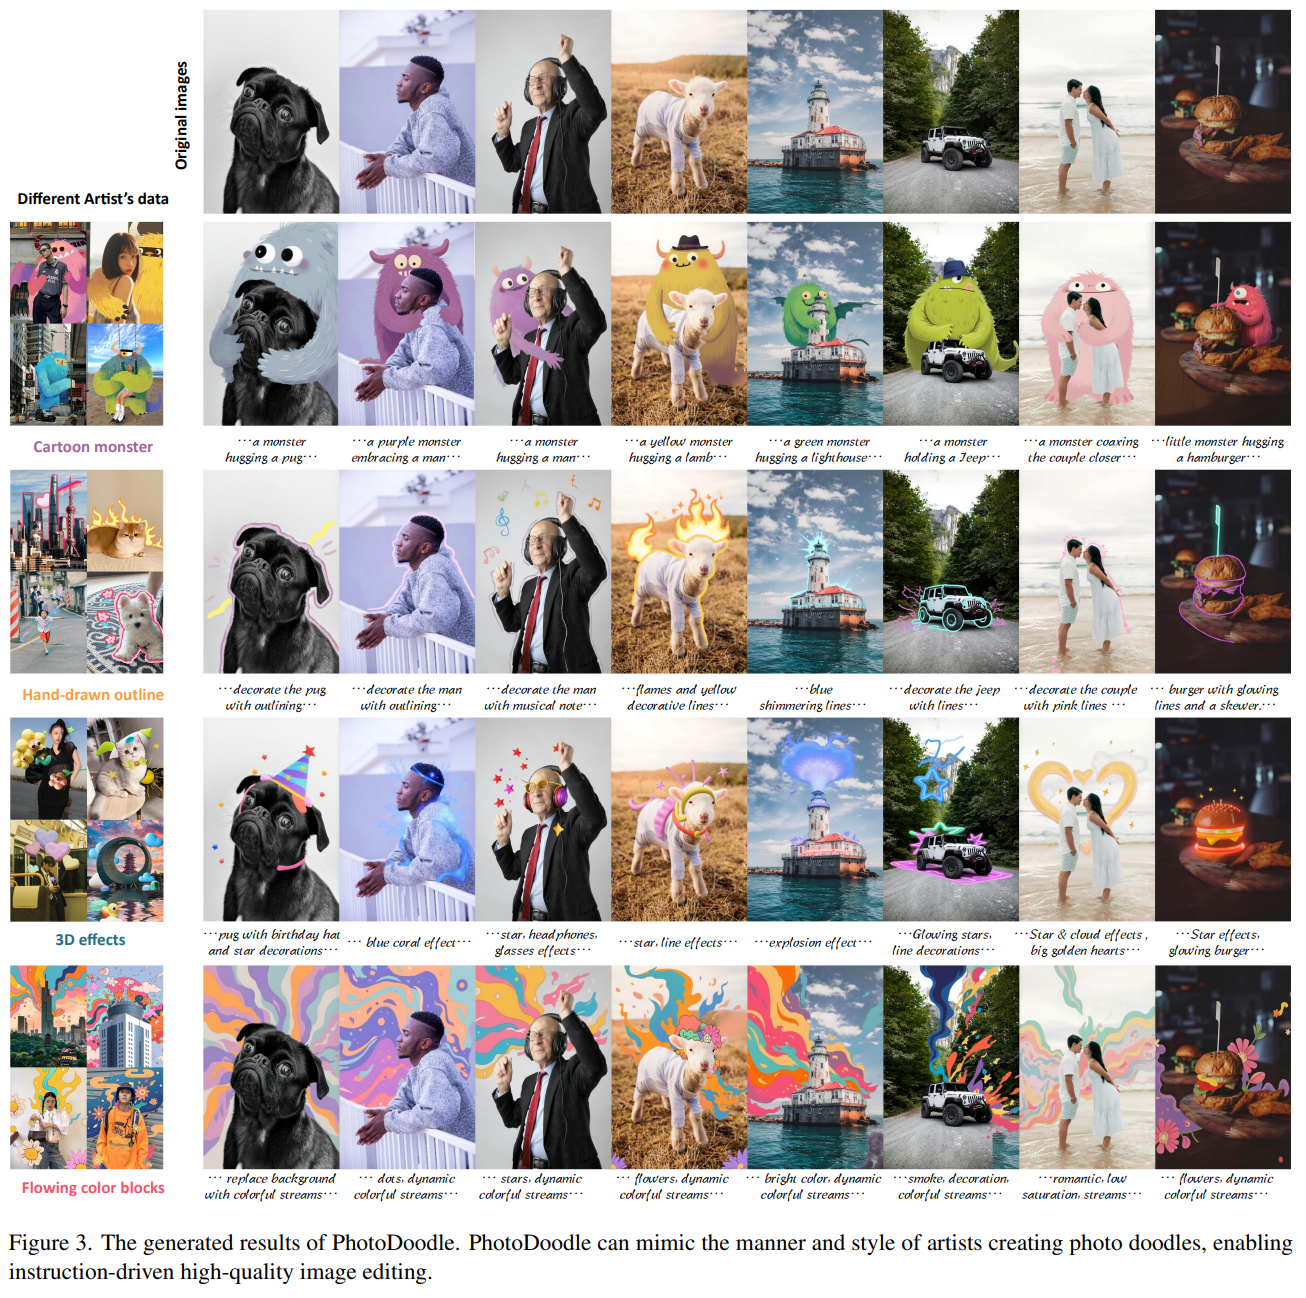
🎨 3. PhotoDoodle의 스타일 예제
PhotoDoodle은 다양한 스타일을 지원하며, Hugging Face를 통해 공개된 모델을 활용할 수 있습니다.
| 스타일 | 설명 | 해상도 |
|---|---|---|
| Cartoon Monster | 만화풍 몬스터 삽화 추가 | 768x512 |
| Magic Effects | 마법 효과, 빛나는 장식 요소 | 768x512 |
| 3D Effects | 입체적 효과 추가 | 768x512 |
| Hand-drawn Outline | 수작업 스타일의 윤곽선 강조 | 768x512 |
| Glowing Neon | 네온 빛 효과 적용 | 768x512 |
| Fantasy Landscape | 신비로운 풍경 스타일 적용 | 768x512 |
🔍 4. PhotoDoodle 실험 결과
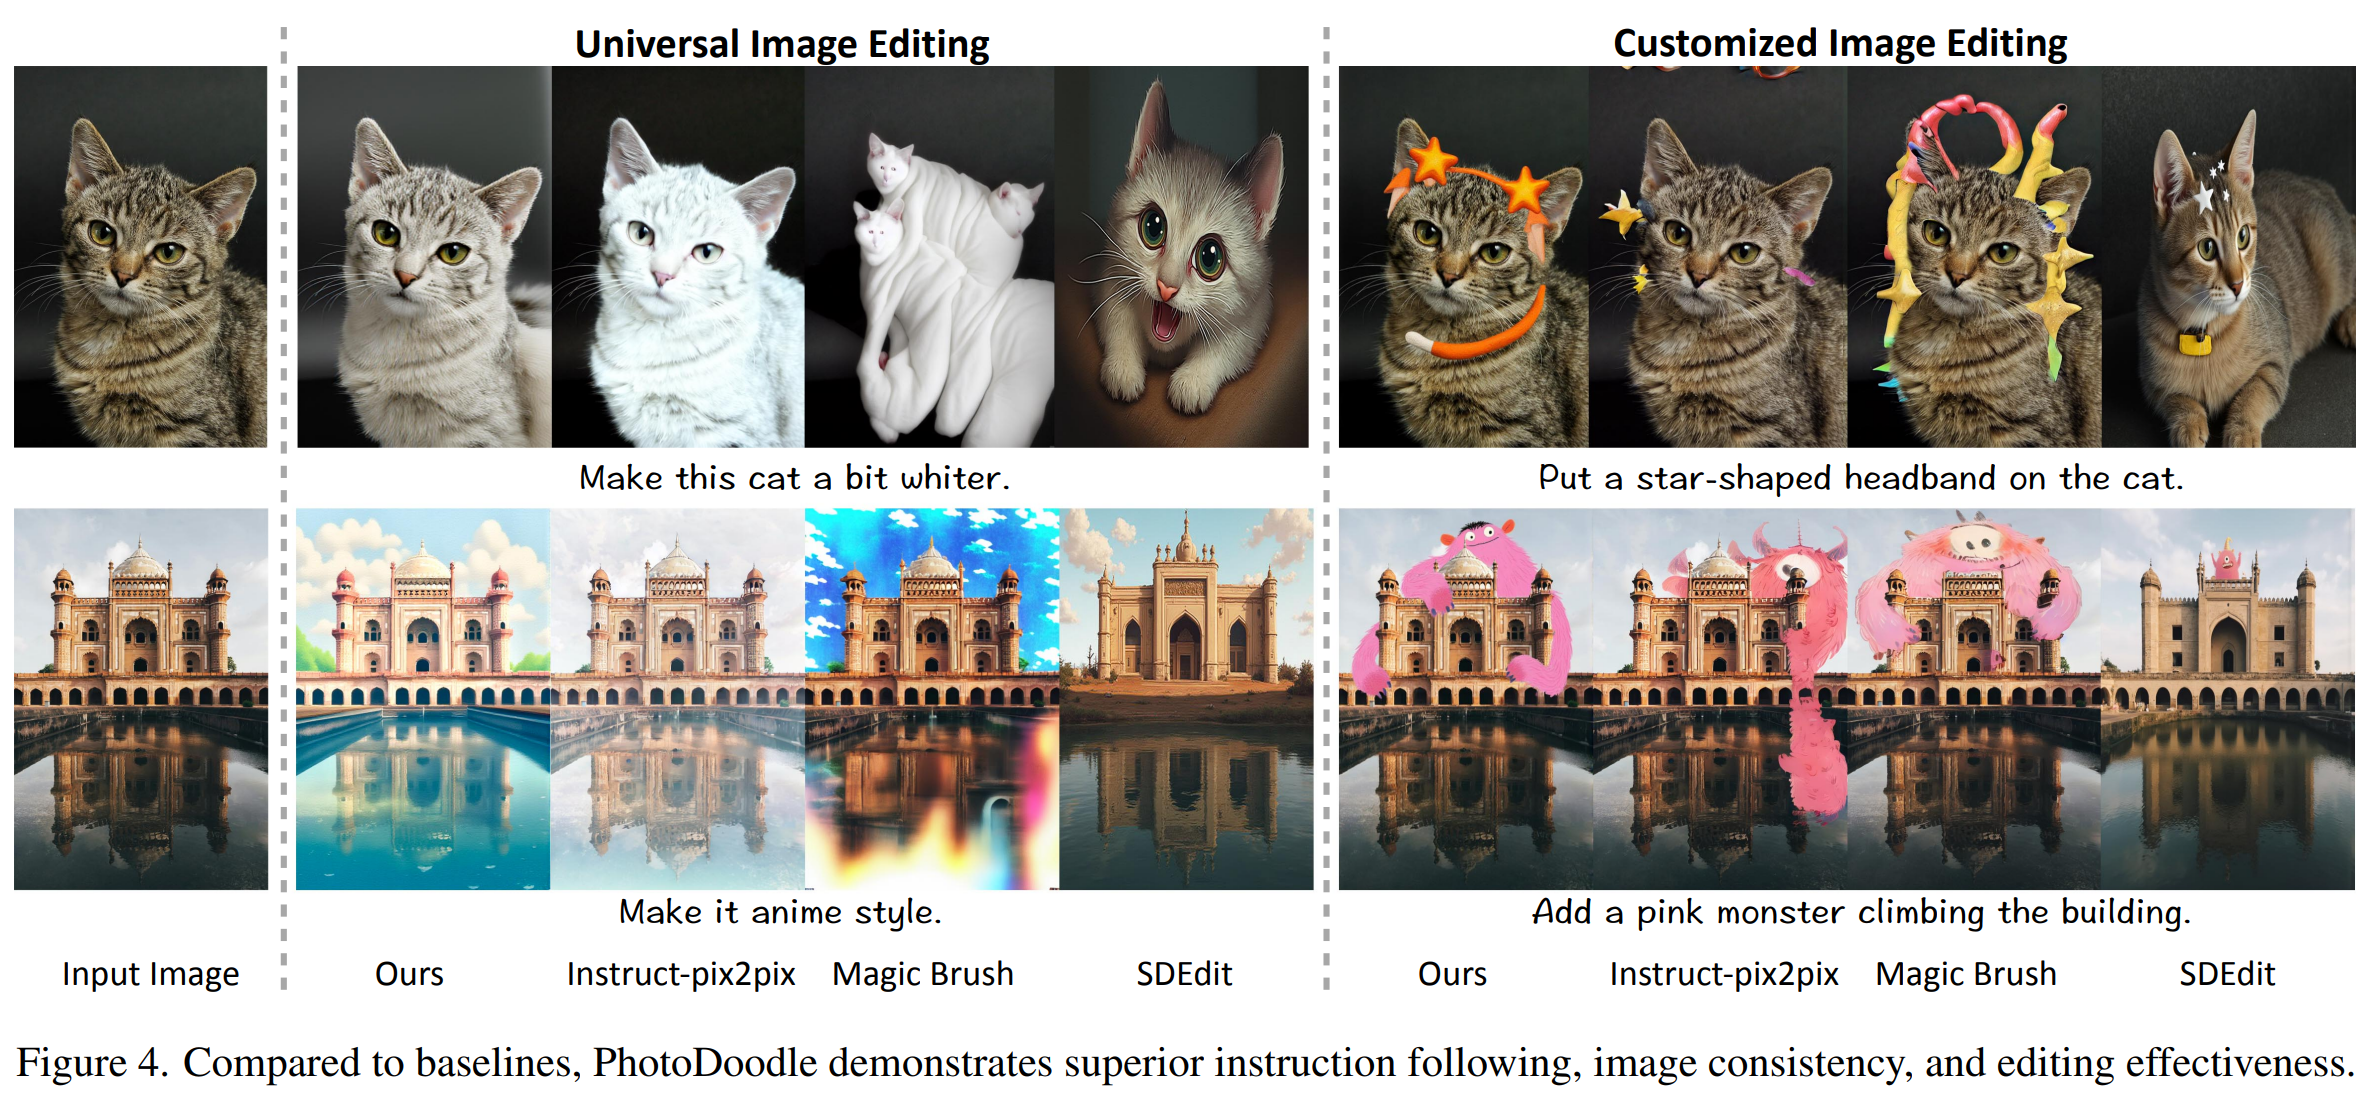
PhotoDoodle은 최신 AI 이미지 편집 모델과 비교하여 뛰어난 성능을 보여주었습니다. 실험 결과에 따르면, 기존의 편집 모델보다 자연스럽고 정교한 결과를 제공하는 것으로 나타났습니다.
비교 실험 결과
| 모델 | CLIP Score ↑ | GPT Score ↑ | CLIPimg ↑ |
|---|---|---|---|
| Instruct-Pix2Pix | 0.237 | 38.201 | 0.806 |
| Magic Brush | 0.234 | 36.555 | 0.811 |
| SDEdit(FLUX) | 0.230 | 34.329 | 0.704 |
| PhotoDoodle (Ours) | 0.261 | 51.159 | 0.871 |
PhotoDoodle은 스타일 재현력, 이미지 일관성, 편집 품질에서 기존 모델들을 뛰어넘는 성능을 보였습니다.
이러한 결과는 PhotoDoodle의 강력한 스타일 학습 및 변형 능력을 입증하며, 향후 다양한 응용 분야에서 활용 가능성을 높여줍니다.
Ablation Study (성능 기여 요소 분석)
PhotoDoodle의 주요 구성 요소가 결과에 미치는 영향을 분석하기 위해 Ablation Study를 수행하였습니다. 주요 실험은 다음과 같습니다:
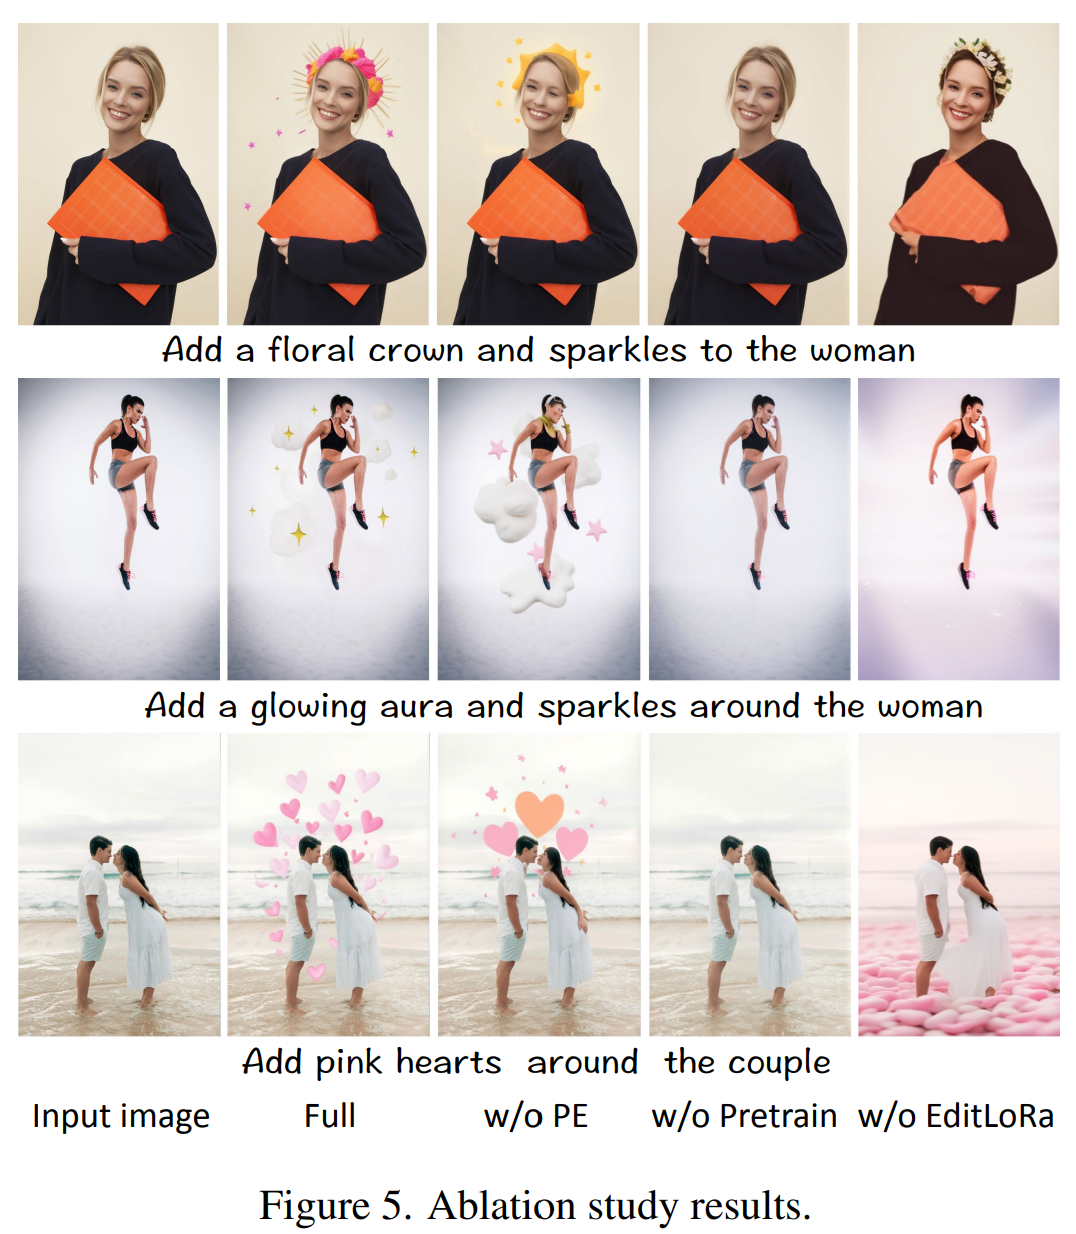
| 실험 구성 | CLIP Score ↑ | GPT Score ↑ | CLIPimg ↑ |
|---|---|---|---|
| OmniEditor 제거 | 0.225 | 31.786 | 0.699 |
| Positional Encoding Cloning 미사용 | 0.231 | 34.891 | 0.712 |
| EditLoRA 제거 | 0.219 | 29.476 | 0.658 |
| Full Model (PhotoDoodle) | 0.261 | 51.159 | 0.871 |
이 실험을 통해 OmniEditor와 EditLoRA가 편집 품질에 중요한 영향을 미친다는 것을 확인할 수 있었습니다. 특히 Positional Encoding Cloning이 일관된 스타일 변환을 유지하는 데 기여하며, EditLoRA가 특정 스타일의 학습 및 적용을 정밀하게 수행한다는 점이 실험을 통해 검증되었습니다.
즉, PhotoDoodle의 핵심 기술들이 서로 보완적으로 작용하여 최적의 성능을 발휘한다는 것을 확인할 수 있었습니다.
📊 5. PhotoDoodle의 확장 가능성 및 미래 전망
PhotoDoodle은 현재까지도 강력한 기능을 제공하지만, 향후 더욱 다양한 분야에서 활용될 가능성이 큽니다. 이를 위해 몇 가지 확장 계획을 고려할 수 있습니다.
✅ 1. 더 많은 스타일 지원
현재 지원하는 스타일 외에도 추가적인 예술적 스타일을 지속적으로 학습할 계획입니다.
- 수채화, 유화, 만화 스타일 추가
- 사용자 맞춤형 스타일 생성 기능 개발
- AI가 자동으로 적절한 스타일을 추천하는 시스템 구현
✅ 2. 비디오 편집 기능 추가
현재는 정적인 이미지 편집에 초점을 맞추고 있지만, 비디오에도 같은 스타일을 적용할 수 있도록 확장할 계획입니다.
- 프레임 단위로 일관된 스타일을 유지하면서 변환
- 특정 오브젝트에만 스타일을 적용하는 기능
- 비디오 장면에 추가적인 애니메이션 효과 적용
✅ 3. 모바일 및 웹 애플리케이션 지원
현재는 연구 및 개발자 중심의 오픈소스 프로젝트이지만, 일반 사용자를 위한 웹/모바일 애플리케이션 형태로 발전 가능합니다.
- 모바일 앱을 통해 누구나 쉽게 이미지 변환 가능
- 웹 기반 편집기를 제공하여 다양한 사용자 접근성 증가
- SNS 플랫폼과의 연동을 통한 원클릭 스타일 변환 기능 추가
✅ 4. AI와 인간 협업 모델 구축
단순한 이미지 변환을 넘어서, 사용자의 의도를 반영하여 AI가 스타일을 추천하고 함께 디자인하는 방향으로 발전할 수 있습니다.
- 사용자의 스타일을 분석하여 최적의 편집 추천
- 음성 또는 자연어 입력을 통한 직관적인 이미지 편집
- 다양한 아티스트와 협업하여 독창적인 AI 스타일 컬렉션 구축
🎯 6. 결론
PhotoDoodle은 소량의 데이터만으로도 특정 아티스트의 스타일을 학습하고, 배경을 유지하면서 자연스러운 이미지 변환을 수행할 수 있는 혁신적인 AI 모델입니다.
🚀 핵심 정리:
✅ 기존 모델 대비 더 정밀한 스타일 복제 가능
✅ 배경 보존 및 자연스러운 스타일 변환 지원
✅ 텍스트 프롬프트를 활용한 직관적인 이미지 편집
✅ 디지털 아트, 게임, 소셜 미디어, 마케팅 등 다양한 활용 가능
✅ 향후 비디오 편집, 모바일/웹 애플리케이션 지원 예정
🛠️ 7. GitHub 코드 실행 방법
PhotoDoodle을 직접 실행해 보고 싶다면, 아래 절차를 따라 환경을 설정한 후 코드 실행이 가능합니다.
📌 환경 설정 및 설치
1
2
3
4
5
6
git clone https://github.com/showlab/PhotoDoodle.git
cd PhotoDoodle

conda create -n doodle python=3.11.10
conda activate doodle
pip install -r requirements.txt
📌 실행
1
2
3
4
5
6
7
8
9
10
11
12
13
14
15
16
17
18
19
20
21
22
23
24
25
26
27
28
29
30
31
32
from src.pipeline_pe_clone import FluxPipeline
import torch
from PIL import Image

pretrained_model_name_or_path = "black-forest-labs/FLUX.1-dev"
pipeline = FluxPipeline.from_pretrained(
    pretrained_model_name_or_path,
    torch_dtype=torch.bfloat16,
).to('cuda')

pipeline.load_lora_weights("nicolaus-huang/PhotoDoodle", weight_name="pretrain.safetensors")
pipeline.fuse_lora()
pipeline.unload_lora_weights()

pipeline.load_lora_weights("nicolaus-huang/PhotoDoodle", weight_name="sksmagiceffects.safetensors")

height=768
width=512

validation_image = "assets/1.png"
validation_prompt = "add a halo and wings for the cat by sksmagiceffects"
condition_image = Image.open(validation_image).resize((height, width)).convert("RGB")

result = pipeline(prompt=validation_prompt,
                  condition_image=condition_image,
                  height=height,
                  width=width,
                  guidance_scale=3.5,
                  num_inference_steps=20,
                  max_sequence_length=512).images[0]

result.save("output.png")
이제 output.png 파일에서 결과 이미지를 확인할 수 있습니다.